Bootstrap Progress bar Form
Overview
We understand quite well this clear horizontal component being really presented void at first and having packed with a vivid color tone little by little while an operation, a download of a documents or else generally any kind of action is being actually finished drop by drop-- we notice it everyday on our devices therefore the information it sends became quite intuitive to acquire-- something gets completed and now it's finished at this specific number of percent or else in case you would prefer examining the empty side of the glass-- there is this much left before completing . One more bonus is that the message it delivers doesn't come across any type of foreign language barrier since it pure graphic so the moment comes time for present the level of our different talents, or else the progress or different components of a project or generally anything having a complete and not just so much parts it is definitely wonderful we are able to have this kind of graphic component inserted right inside our pages in a uncomplicated and quick way.
What's new?
Within the most recent fourth edition of probably the most preferred mobile friendly system this grows even speedier and less complicated with simply a single tag element and also there are a lot of modifications attainable that are accomplished with just appointing the appropriate classes. What's fresh here is since the Bootstrap 4 gives up the IE9 support we can in a moment get whole advantage of the abilities of HTML5 and as an alternative to producing the outer so called empty container along with a <div> first and wrapping within the real fill amount in some other <div> element inside it and styling its size to display the concrete Bootstrap Progress bar Component as it used to be with the former edition today we can surely simply employ the HTML5 <progress> element specifying the max value and the value so far performed just as properties.
Primary features
If you want to set up simply make a <progress> element along with the class .progress assigned to it and incorporate the value = " ~ the amount you have progressed so far ~ " and max = " ~ the overall amount ~ " attributes to it. There is actually a notable fact here-- these can surely be any quantities anyway-- the logic is the max attribute value needs to always be bigger than the value itself however in the case that you play around and generate the max smaller than the progress value in itself you'll just turn out with a filled progress bar similar to the task's been fully performed. On the other hand you do not really should count anything to get those values in percentage or anything-- in case for instance you possess 2567 strawberries to eat and you have feasted upon 378 of them-- record it precisely { in this way and the progress bar are going to display effectively spreading the colored part as far as 378 correlates to 2567-- fast and convenient .
So right now when we realize exactly how it works let's discover the ways to make it look more effective designating several effects and colors .First of all-- we can utilize the contextual classes mixed along with the .progress- in a class-- like .progress-warning , .progress-info and so on designated to the <progress> component. We can easily in addition add in several stripes to our progress bars using the .progress-bar-striped class as well as certain animation to these stripes with the .progress-bar-animated added.
And finally if you need to obtain older browser compatibility you can use two <div> elements – as in the older version outer one with just the .progress class and inner with all the appearance adjustment classes and an inline styling setting the filled in width like style = " width:23%; " - still works as well.
And finally assuming that you have to attain earlier web browser compatibility you have the ability to work with pair of <div> elements-- like in the earlier version outer one with simply just the .progress class and inner with all of the appeal adjustment classes and an inline styling setting up the completed width like style = " width:23%; " - currently works as well.
Examples and tips
Tips on how to work with the Bootstrap Progress bar Example:
Bootstrap Progress bar Working items are constructed with two HTML components, certain CSS to set up the width, as well as a several attributes.
We utilize the .progress as a wrapper to reveal the optimum value of the progress bar.
We operate the internal .progress-bar to reveal the progress so far.
The .progress-bar demands an inline design, utility class, or else custom made CSS to set their width.
The .progress-bar likewise demands some role and aria attributes to keep it available.
Add that all with each other, and you have the following examples.
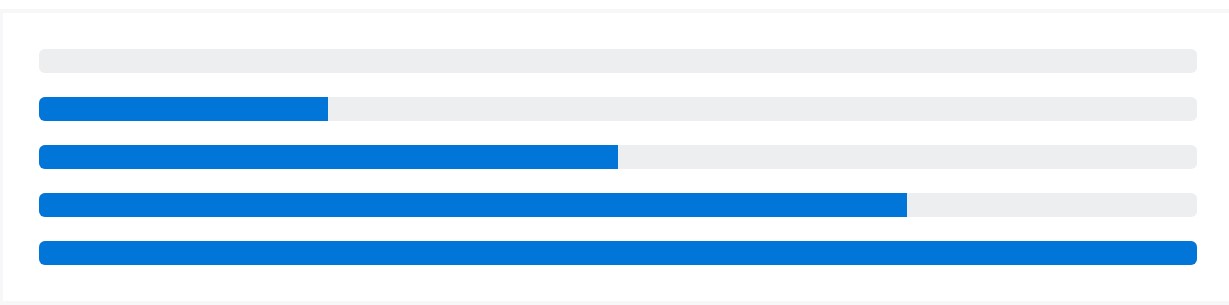
<div class="progress">
  <div class="progress-bar" role="progressbar" aria-valuenow="0" aria-valuemin="0" aria-valuemax="100"></div>
</div>
<div class="progress">
  <div class="progress-bar" role="progressbar" style="width: 25%" aria-valuenow="25" aria-valuemin="0" aria-valuemax="100"></div>
</div>
<div class="progress">
  <div class="progress-bar" role="progressbar" style="width: 50%" aria-valuenow="50" aria-valuemin="0" aria-valuemax="100"></div>
</div>
<div class="progress">
  <div class="progress-bar" role="progressbar" style="width: 75%" aria-valuenow="75" aria-valuemin="0" aria-valuemax="100"></div>
</div>
<div class="progress">
  <div class="progress-bar" role="progressbar" style="width: 100%" aria-valuenow="100" aria-valuemin="0" aria-valuemax="100"></div>
</div>
Bootstrap provides a number of utilities for setting up width. Depending upon your needs, these can assist with quickly configuring progress.

<div class="progress">
  <div class="progress-bar w-75" role="progressbar" aria-valuenow="75" aria-valuemin="0" aria-valuemax="100"></div>
</div>
Modifying
Customise the appeal of your progress bars through custom CSS, background utilities, stripes, and even more.
Labels
Put in labels to your progress bars through setting message in the .progress-bar.

<div class="progress">
  <div class="progress-bar" role="progressbar" style="width: 25%;" aria-valuenow="25" aria-valuemin="0" aria-valuemax="100">25%</div>
</div>
Height
We only set a height value on the .progress-bar, so in case you alter that value the outer .progress will instantly resize as needed .

<div class="progress">
  <div class="progress-bar" role="progressbar" style="width: 25%; height: 1px;" aria-valuenow="25" aria-valuemin="0" aria-valuemax="100"></div>
</div>
<div class="progress">
  <div class="progress-bar" role="progressbar" style="width: 25%; height: 20px;" aria-valuenow="25" aria-valuemin="0" aria-valuemax="100"></div>
</div>
Backgrounds
Utilize background utility classes to evolve the appeal of specific progress bars.

<div class="progress">
  <div class="progress-bar bg-success" role="progressbar" style="width: 25%" aria-valuenow="25" aria-valuemin="0" aria-valuemax="100"></div>
</div>
<div class="progress">
  <div class="progress-bar bg-info" role="progressbar" style="width: 50%" aria-valuenow="50" aria-valuemin="0" aria-valuemax="100"></div>
</div>
<div class="progress">
  <div class="progress-bar bg-warning" role="progressbar" style="width: 75%" aria-valuenow="75" aria-valuemin="0" aria-valuemax="100"></div>
</div>
<div class="progress">
  <div class="progress-bar bg-danger" role="progressbar" style="width: 100%" aria-valuenow="100" aria-valuemin="0" aria-valuemax="100"></div>
</div>
Multiple bars
If you require, feature multiple progress bars inside a progress component .

<div class="progress">
  <div class="progress-bar" role="progressbar" style="width: 15%" aria-valuenow="15" aria-valuemin="0" aria-valuemax="100"></div>
  <div class="progress-bar bg-success" role="progressbar" style="width: 30%" aria-valuenow="30" aria-valuemin="0" aria-valuemax="100"></div>
  <div class="progress-bar bg-info" role="progressbar" style="width: 20%" aria-valuenow="20" aria-valuemin="0" aria-valuemax="100"></div>
</div>
Striped
Incorporate .progress-bar-striped to any .progress-bar in order to apply a stripe by using CSS gradient over the progress bar's background colour.
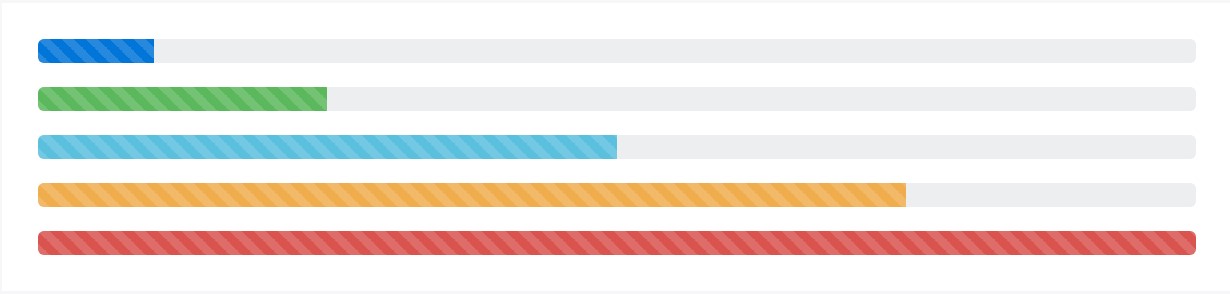
<div class="progress">
  <div class="progress-bar progress-bar-striped" role="progressbar" style="width: 10%" aria-valuenow="10" aria-valuemin="0" aria-valuemax="100"></div>
</div>
<div class="progress">
  <div class="progress-bar progress-bar-striped bg-success" role="progressbar" style="width: 25%" aria-valuenow="25" aria-valuemin="0" aria-valuemax="100"></div>
</div>
<div class="progress">
  <div class="progress-bar progress-bar-striped bg-info" role="progressbar" style="width: 50%" aria-valuenow="50" aria-valuemin="0" aria-valuemax="100"></div>
</div>
<div class="progress">
  <div class="progress-bar progress-bar-striped bg-warning" role="progressbar" style="width: 75%" aria-valuenow="75" aria-valuemin="0" aria-valuemax="100"></div>
</div>
<div class="progress">
  <div class="progress-bar progress-bar-striped bg-danger" role="progressbar" style="width: 100%" aria-valuenow="100" aria-valuemin="0" aria-valuemax="100"></div>
</div>
Animated stripes
The striped gradient can in addition be actually animated. Incorporate .progress-bar-animated to .progress-bar in order to animate the stripes right to left by means of CSS3 animations.
Animated progress bars do not work in Opera 12-- as they do not support CSS3 animations.

<div class="progress">
  <div class="progress-bar progress-bar-striped progress-bar-animated" role="progressbar" aria-valuenow="75" aria-valuemin="0" aria-valuemax="100" style="width: 75%"></div>
</div>
Final thoughts
So generally that's the approach you can demonstrate your development in beautiful and almost fast progress bar components with Bootstrap 4-- now all you need to have is certain works in progress to get them showcased.
Check a few youtube video guide regarding Bootstrap progress bar:
Linked topics:
Bootstrap progress bar authoritative documentation
Bootstrap progress bar article
How to animate a progress bar in Bootstrap 4?
